Games

God Of War Ragnarok, Design, Games

Ragnarök's "The Slumbering Trolls" Quest: Design Retrospective

In the below post, I talk about challenges I faced while working on God of War: Ragnarök’sThe Slumbering Trolls” quest. I’m sharing this anecdote to share how I approach problem-solving as a Quest/Systems Designer.


During the production of God of War: Ragnarök, I was tasked with a creating a quest where Kratos would awaken Trolls petrified in stone by inserting a “Cleansing Rod” into stone consoles in front of the Trolls. However, as I started to work on the quest, my producer informed me that there was no longer time in the budget to create the assets originally planned for this quest Due to this, my lead informed me that the quest would likely be cut.

Two Stone Trolls in Vanaheim.

I knew this was a favorite quest of the team and our director, so I investigated ways that we could redesign the quest using existing assets. First, I did a review of our game’s “vision documents”, which articulated at a high-level what kind of experience our director aimed to create with Ragnarök. One of the games referenced in these documents was Castlevania: Symphony of the Night, so I played that game in my free time and took note of how it structured its quests. I noticed that many areas of Dracula’s Castle could be unlocked by using a mechanic discovered in a totally different part of the Castle, so I endeavored to have the Stone Troll quest use a similar lock and key structure.

One of the things that made this lock and key design satisfying is that you weren’t explicitly told which “keys” were for which “locks.” For example, early in Castlevania: SOTN, you come across a see-through grate that blocks your path. Later on, you find a relic called “Form of Mist” that allows you to temporarily turn into a cloud of mist. Discovering how Castlevania’s Relics interact with Dracula’s Castle was one of the high points of SOTN for me, so I wanted to emulate the same sense of discovery with this quest.

“The Form of Mist” relic (in right column) allows the player to move through grates in Dracula’s Castle.

A Player uses the “Form of Mist” relic in Castlevania: Symphony of the Night to move through a grate. We aimed to replicate similar lock-and-key gameplay in the Stone Troll quest.

With that design philosophy in mind, I surveyed Ragnarök for mechanics and abilities that could be used to awaken the Stone Trolls. At first, I thought I could use the Draupnir Spear to awaken the Trolls because the player unlocked it around the same time they would have originally unlocked the “Cleansing Rod” in the original design of the quest. I felt the best way to preserve the mystery of the quest (and add some light puzzling) was to have the Player activate the Troll by embedding spears in stone Idols hidden around each Troll, similar to how the Player unlocks Nornir Chests in other parts of the game. Since God of War (2018) and the first half of God of War: Ragnarök teaches the Player that these Idols will always give the Player a reward, I felt substituting the reward for a difficult boss fight would make for quite a surprise! (I was inspired by this moment in TLOU2.) I built a quick prototype of this concept for Anthony DiMento, my lead, and he was happy with the design.

A Nornir chest in the final game that is unlocked by embedding spears in Idols near the chest.

However, I had forgotten to account for the fact that the Cleansing Rod was also supposed to unlock a Stone Dragon in the game’s Dragon Beach region. This was a problem because that region already had a Nornir Chest puzzle that used the same Stone Idols that I would have used to unpetrify the Stone Dragon. Moving that chest was out of the question, so I had to return to the drawing board.

Stone Dragon in Ragnarok’s Dragon Beach region. It was important that this dragon be unpetrified in the same way the trolls were.

Around this time, there had been several changes to Ragnarok’s Relics, which are permanent items the Player can use to activate various combat effects. I asked my lead if we could use some of the cut Relic assets and unlock locations to create a new relic that would only unpetrify the Stone Trolls and Stone Dragon when activated. Crucially, we would not explicitly tell the Player that this Relic (the “Mystical Heirloom”) unpetrified the Trolls; we would only hint at it via banter and lore scrolls.

Both my lead and Eric Williams, the game’s director, approved of this idea. To further sell this idea, I cracked open my book of Norse Mythology and found a Dwarf called Alviss who was himself petrified by Thor. I then worked with Anthony Burch, the quest’s writer, to weave this Dwarf into our quest. Since Alviss is the character in Ragnarök who is responsible for petrifying the Trolls, I felt his mythology-dictated fate would add some funny irony to the quest (though he is technically found frozen in Ragnarök.)

Alviss is found frozen alongside the Mystical Heirloom and a lore scroll.

Alviss, a Dwarf who tried to marry Thrud, Thor’s daughter. Thor disapproved of this match, so he tricked Alviss into being petrified by the sun. Stone cold.

After some playtesting and tuning, we were able to implement a quest that was true to our director’s vision of the game without creating additional work for other departments. Players enjoyed the quest and IGN even did a short feature on it. I’m proud of the work I did on this quest because it made the game better and my team’s lives easier.

This quest was made by possible by working with these great people:
Writer: Anthony Burch.
Level Designers: Naomi Jade, Joel Grattan, Jacob Antonucci, Brendon Fitzgerald.
Combat Designers: Robert Rappoport, Henry Lee, and Stephen Oyarijivbie.
Senior Progression Designer: Ryan Baker.
Lead: Anthony DiMento.
Producer: Katie Tigue.
Director: Eric Williams.
Ragnarök’s Directors.

Design, Games, God Of War Ragnarok

My Work on God Of War: Ragnarök

I’m writing this post to answer a question I often get: what did I do on God of War: Ragnarök? The short answer is my official title was Associate Systems Designer and I worked on ten side quests, most of the game’s collectibles, and on the banter systems for key side characters like Ratatoskr, Brok, Sindri, and Gna. But the follow up question I get just as often is: what exactly does it mean to work on those things?

Every one of the side quests I worked on had different needs and were in different states of development when I was assigned them. Some were mostly done (“The Elven Sanctum”) and others I took from design document to the state they exist in on the disc today (“Across the Realms”). Additionally, there was a wide variety of side quests. Some were combat-focused (“The Last Remnants of Asgard”), some were puzzle-focused (“The Broken Prison”), some were narrative-focused (“A Stag for All Seasons”), and others were easter eggs (“The Slumbering Trolls.”) But even with this variety of quests, I found myself solving similar problems, even when the goal of the quest differed. So, in this post, I will look at a few of these quests and break down the issues our team faced and how we solved them. My hope is that this post can give you a better idea of how I approach problems as a designer, particularly in a AAA context.

Note: There will be significant spoilers for God of War: Ragnarök throughout this post.

Protecting tone

One of my favorite quests that I worked on in Ragnarök was “Kvasir’s Poems.” This was a whimsical collectible set in which each collectible was a book of poetry that made humorous references to other PlayStation games like Ratchet and Clank, Death Stranding, and even MLB: The Show.

The goal with this quest was to support the playful vision for the collectible set while not undercutting the serious tone of Ragnarök as a whole. To make each book feel impactful, I worked with our amazing level design team to find spots for each book that reflected the themes or subject matter of the game it referenced. For example, the Ratchet and Clank book is next to a set of gears in Svartalfheim while the Journey book is initially covered in sand in the Alfheim desert.

The issue with this approach is that sometimes the best spot for a particular collectible might be too close to a key piece of critical path dialogue or the dialogue of another major side quest. For example, the Major League Baseball book was initially supposed to be next to a bar in Nidavellir, the Dwarven capital, but was moved because it was too close to banter that would fire when Atreus and Kratos entered the city for the first time. To avoid these kinds of issues, I had to know the critical path banter and all side quest banter like the back of my hand. I also had to be aware when other side quest or critical path moments were moved or cut, because that could mean that my artifacts were now conflicting with other banter. Sometimes, these cuts would necessitate moves that created a domino-effect where many pieces of banter would need to find a new home. I think hand-programming this banter made it so our characters felt like they were actually reacting to the world around them as opposed to running through a pre-ordained script.

Sometimes there would not be a direct conflict between two bits of side quest content, but the resulting tonal mismatch would be unacceptable. For example, the Journey book of the Kvasir’s Poem collectible set was initially supposed to be near the basement of the Elven Sanctum, where Kratos and his companion would discover a grisly secret murder. The problem is that the Kvasir’s Poems artifacts could trigger humorous banter depending on what order the player picked them up. So while there was no direct banter overlap, putting that book in that spot caused the player to sometimes experience a very dark scene next to a humorous one. To protect the tone of the Elven Sanctum quest, we had to move the book, even though there was not a clear spot for it at the time.

Kratos finds a pile of Elven corpses outside the Elven Sanctum.

Much of the design work I did was this kind of design Sudoku. It was less about finding the best spot for a particular piece of content and more about making sure all the content sang in harmony. One of the mantras that Anthony DiMento, our team’s lead, would repeat to us is that even if 1 in 1000 players encountered a bug or banter conflict, that’s still 1,100 people that will experience it given our huge userbase. Attention to detail was paramount.

Working with narrative

Sometimes, there would be no good place to put a collectible or quest item. For example, one of the tasks I was given during Ragnarök was to place the nine flowers of the “Nine Realms in Bloom” artifact set. The idea behind this set was to put one flower collectible in each of the nine realms. The problem was that at that point in the project, there were no plans for Kratos to be able to freely revisit Jotunheim or Asgard.

The Svartalfheim flower.

We didn’t want to “wave away” this inconsistency by placing these two flowers in a random spot, so the writer Anthony Burch and I brainstormed how we could resolve this issue. We scoured the game for spots where these flowers could exist and the game’s lore for reasons those flowers could exist outside of their parent realm. (At all points in the project, I had several textbooks of Norse and Greek mythology on hand for this kind of research.)

After some research, we discovered two spots. As those who have beaten the game know, the game’s climax is the destruction of Asgard, which causes chunks of Asgard to fall into the other realms. Our initial inclination was to put the flower in one of these chunks (which make up the “The Last Remnants of Asgard” quest, another of my quests) but our flower model was quite dainty, so it didn’t make sense to us that the flower would fall hundreds of miles to the ground and still be intact.

We then moved our search to “The Broken Prison”, a prison of Asgard that had fallen into the Niflheim region. It made more sense to us that the flower could survive the fall if it fell within a huge building, but we still needed a justification as to why the flower was inside the prison. After looking through the prison, we saw that there was a corpse in an empty cell. We thought it would be poetic for this unnamed character to dedicate the last of his life to take care of this flower, so we placed the Asgard flower next to his corpse and wrote some dialogue that told that story.

The Asgard Flower. The corpse can be seen beside Kratos’s head.

The Jotunheim flower was trickier because Jotunheim was written to be an elusive place in the God of War universe. When I joined the project, Kratos and Freya (who serves as the player’s companion in the postgame) were never supposed to visit Jotunheim at all. When the game’s lore did not give a good reason to justify the flower growing in another realm, Anthony Burch and I began to investigate other characters related to Jotunheim. Of the few characters associated with Jotunheim, only Faye, Kratos’s deceased wife, found her way into other realms like Midgard and Vanaheim. After conferring with the narrative team, we decided to put the flower in Kratos’s and Atreus’s backyard.

The problem then was that there was lot of key banter around the house in the first half of the game, so we couldn’t put the flower there for fear of banter overlap. Eventually, we were able to solve this by having the dialogue reflect that Faye had planted the seed for the flower a long time ago but it did not have the chance to sprout until Ragnarök arrived at the end of the game. Ultimately, we decided not to go in this direction because it was decided that Kratos and Freya should be able to visit Jotunheim in the post-game, but I’m proud of the solution we found.

The Jotunheim flower was ultimately placed in the optional postgame Jotunheim area.

Nuts and Bolts

Towards the end of the project, I was assigned to help finish the work that had started on Ratatoskr and the game’s three dwarven shopkeepers (Brok, Sindri, and Lunda). This involved ensuring that these four characters could give Kratos their respective quests. I also had to ensure that these characters would react accordingly to the events of the main campaign and the specific side content that the player had embarked on. In many ways, this was the most complex task I was assigned because between these characters there were thousands of lines of dialogue, some of which had very specific requirements.

To give you an idea of how specific these requirements got, I had to program a specific line Ratatoskr would say if Brok had died recently, the player has gathered only one lindwyrm, and they had not yet started the “Stag for All Seasons” quest. Making sure these lines played at the correct time required me to know the game’s story and side quests intimately. I had to visualize all the different paths that the player could take before encountering these characters.

Ratatoskr, voiced by the awesome ProZD. Fun fact, I had watched a video by ProZD the day I got the call confirming that I had been hired to work on God of War: Ragnarök.

In addition to making sure that the correct line would play at the right time, I had to make sure that the character speaking the line would be playing the correct animation. For many of these conversations, I hand-programmed what or who each character would be looking at and, in some cases, programmed minor animations or gestures to play on the speaking character to add life to the conversation. Since there were hundreds of lines each with their own set of prerequisites and animations, this led to some odd bugs. For example, there was a point in production where Brok was mysteriously speaking lines of dialogue after he had passed away in the story. We found that this was happening because the banter system had found his resting corpse within the scene and was playing lines out of his rig’s mouth. Thankfully, most bugs were not so haunted.

After these more technical bugs were sorted, my attention turned to bugs that were more about narrative continuity. Since there were hundreds of lines each with varying levels of emotion and tone, part of my job was identifying where lines could combine (however unlikely) to create an experience that broke immersion. For example, Ratatoskr had several lines where he mourned the loss of Brok and also many lines full of innuendo. We couldn’t have those back-to-back. I poured over spreadsheets with Orion Walker, Ratatoskr’s writer, for hours to identify these tonal conflicts and rescript our dialogue system to avoid them. While it was hard work, I believe it led players to feel these characters had a level of interiority. I’m particularly proud that the YouTuber VideoGameDunkey ended his glowing video review of God of War: Ragnarok with some footage of Ratatoskr reacting to the player hitting the chime over and over.


Thank you for allowing me to share some of my process as a Systems and Quest Designer with you. All the work described above was a team effort between the studio’s many talented designers, producers, artists, writers, directors, and QA personnel. I’m proud of the work that our team did.

In the future, I may write more essays about what it means to be a Systems Designer in a AAA context and talk more about some of the other content I worked on in God of War: Ragnarök.

Book Review, Games, Programming

Game Dev Book Review: How Two Patterns from "Design Patterns" Can be Applied to Game Development

I am always trying to upgrade my software engineering skills so that I can design and produce more interesting games. Last month, I learned a tremendous amount from the seminal coding book Clean Code (which I covered in this blog post), so I thought I would next study Design Patterns: Elements of Reusable Object-Orientated Software, another software engineering classic.

I learned a huge amount from this book, so I wanted to share some interesting ideas from it. While many of the design patterns in the book have been discussed at length, not all of them have been discussed extensively in the context of game development. So, in this blog post, I will discuss how the Decorator and Bridge patterns can be used in game programming. My hope is that these examples will help readers recognize how these patterns can apply to their own projects. I’ll be using examples from popular games to illustrate these patterns, though I will be tweaking details to keep things simple.


Pattern: Decorator.

What it’s Generally Used For:

To add functionality to an object dynamically without changing the object itself. Decorators can “stack” onto each other, so you can add a theoretically infinite number of decorators to an object. In some cases, the order in which the decorator is applied to an object can create novel functionality.

One Potential Use in Games: Adding stackable attributes and behavior to in-game items.

Helpful Physical Metaphors: Russian Nesting Dolls, Onions.

Example: Borderlands and its procedurally generated weapons.

Games like Borderlands often boast that they effectively support an infinite number of unique weapons. In practice, these weapons are not totally unique but rather a set of base weapons (crossbows, shotguns, rocket launchers, etc.) that can be modified ad infinitum via a set of shared stats (reload rate, fire-damage, ice-damage, fire rate, etc.)

Some of the traits of weapons in Borderlands  3. The weapon stats on the left column here best fit our discussion of the Decorator pattern. Borderlands Cheat Sheet from Rock Paper Shotgun. Click on the image to see the original article.

Some of the traits of weapons in Borderlands  3. The weapon stats on the left column here best fit our discussion of the Decorator pattern. Borderlands Cheat Sheet from Rock Paper Shotgun. Click on the image to see the original article.

It is impractical for the game’s developers to create a combination of each base Weapon and set of stats, so they might use the Decorator pattern. What the decorator pattern allows the programmer to do is “wrap” a base object with additional functionality, like how a Russian nesting doll can be wrapped by another Russian nesting doll. When a Client (a program that sends a request to another program) needs some information from this nesting doll-like structure, it gets information from the outermost doll then moves onto the next smallest doll until it reaches the very smallest doll. When it reaches this base doll, it will return all the data it collected along the way to the Client.

One gun from Borderlands. Click on the image to see the Rock Paper Shotgun article where it came from.

One gun from Borderlands. Click on the image to see the Rock Paper Shotgun article where it came from.

For example, let’s say that in the new Borderlands there is a Shotgun, Rocket Launcher, and Crossbow that all inherit from the Weapon superclass. All Weapons share some basic stats (reload speed, fire-rate, damage, etc.) In our example, Player A finds a Fire Upgrade that adds Fire damage to a Shotgun in their inventory. If the Shotgun was programmed using the decorator pattern, this Fire Damage upgrade could be wrapped around the Shotgun base object.

A key point here is that the Shotgun class and the FireDamageUpgrade decorator inherit from the same Weapon superclass, so when a Client encounters the Fire Damage Decorator wrapped around the Shotgun (the client cannot access the Shotgun directly because the decorator is around it), it still treats the Decorator as a Weapon.

To use an onion metaphor, we do not consider a layer of an onion by itself to be a full onion, but we do treat a layer of onion on top of other layers to be an onion. A FireDamageUpgrade decorator by itself cannot function as a Weapon class, but when it is wrapped around a Shotgun class it is treated as a Weapon.

The strength of this pattern is its flexibility. In the Borderlands example above, the Decorator pattern allows me to:

  • Remove decorators I do not want (I can reverse the Fire Damage upgrade).

  • Easily add new functionality (I can add a Fire Damage upgrade on top of another Fire Damage upgrade.)

  • Create unique functionality through the order the decorators are wrapped (I can put a DamageMultiplier decorator that multiplies the effects of previous decorators.)

Implementation:

C# Implementation

Tutorial Video


Pattern: Bridge Pattern.

What it’s Generally Used For: Allows two superclasses to evolve independently of each other yet still work together.

One Potential Use in Games: Matching AI personalities with NPC bodies that can express those personalities.

Helpful Physical Metaphor: Royal families and their subjects.

Example: Companions and their Fighting Styles in The Outer Worlds.

The Bridge pattern is very abstract, so I will first describe it in metaphorical terms.

Imagine there is a Royal family that rules over a group of Servants. The Servants are bound by an Oath that says they will Feed, Protect, and Entertain any member of the Royal family. Any Royal can call on any Servant to fulfill any part of the Oath. For example, a Royal King can call on any Servant Knight or Farmer to Entertain him. 

What makes things interesting is that every servant has their own definition of fulfilling each part of the Oath. A Knight might Entertain a Royal by juggling swords, while a Farmer might Entertain a Royal by telling fables. A Jester might feed a Royal princess by gathering apples for her, while a Knight will feed the Princess by hunting a boar for her. The society functions (in its oppressive feudal way) like clockwork because every Servant can fulfill every part of the Oath and the Royals only command the Servants through the Oath.

A UML diagram of this Royal / Servant society. Click on this image to see this diagram in more detail.

With this structure, Royals can ask for elaborate combinations of the Oath’s parts. A King, for example, can DemandFeast(), which can consist of four DemandEntertainmant() calls and 2 DemandFood() calls. A Prince can DemandCircus(), which comprises four DemandEntertainment() calls. Since every Servant can Entertain and Feed, the King’s Feast command can be carried out by any Servant.

The advantage of this structure is that as long as the Royals only ask for what is in the Oath and every Servant continues to fulfill the Oath, new Servants and Royals can enter the society without changing the behavior of existing Servants or Royals. For example, a new Servant Chef can join the society who Protects() by swinging a wooden spoon, Feeds() by cooking turkey, and Entertains() with parlor tricks. Since the Chef can Protect, Feed, and Entertain, he can serve any Royal. The Oath, in this metaphor, is the Bridge between the Royal superclass and the Servant superclass.

Imagine that the same society wanted to function without an Oath between Royals and Servants. Whenever a Royal asked a Servant to do something, they would need to check whether the Servant was capable of performing that task. If there were twenty Servants and twenty Royals, there would be 400 possible interactions between the groups to account for. That is a lot of room for error!

So how can this pattern be applied to game development?

One unconventional way the Bridge pattern could be used in Game Development is assigning Fighting Styles (AKA personalities) to Companion NPCs.

A Companion fighting an enemy in The Outer Worlds.

In The Outer Worlds, a sci-fi action-RPG, you spend a significant portion of the game with Companions that fight enemies alongside you. At any point in the game, you can ask this Companion to change their Fighting Style to either Aggressive, Defensive, or Passive. The Companions will use their loadout and unique combat ability to fulfill the Fighting Style you have chosen for them. So if you ask Parvati, the mechanic Companion, to act Aggressively, she will Shoot, Charge, and use her combat ability “Overload” to do so.

The stat sheet of Parvati, the first Companion most players will encounter.

For sake of simplicity, we’ll assume that all of the companions share a set of combat “primitives”, like Hide, Shoot, Charge, Heal, etc. A “Shoot” primitive may look different for every companion, but every companion is capable of fulfilling the “Shoot” request. Fighting Styles call on combinations of the primitives to create a semblance of a personality. A Passive fighting style might consist of mostly Healing and Hiding, while an Aggressive fighting style might consist of mostly Charging and Shooting. 

The six Companions in Outer Worlds.

There are only six Companions and Three Fighting Styles in The Outer Worlds, so there are only eighteen possible combinations of Companions and Fighting Styles. It’s possible that Obsidian hard-coded each permutation of Fighting-Style and Companion (Aggressive-Parvati, Passive-Nyoka, Passive-Vicar Max, Defensive-Parvati, etc.) but they also may have used the Bridge pattern.  

(In this context, the Fighting Style would be our Royal / Abstraction and the Companion would be our Servant / Implementer [Abstraction and Implementer being the formal names for those parts of the pattern.])

There would be many advantages to using the Bridge pattern in this situation. Let’s say Obsidian, the developer of Outer Worlds, wanted to add Morty from Rick and Morty as a Companion in a new DLC. If Morty inherited from the Companion subclass, Obsidian would not need to program an Aggressive-Morty, Passive-Morty, and Defensive-Morty. As long as Morty inherited from the Companion superclass, those permutations of Morty would automatically be available.

Aggressive-Morty.

The same would be true if Obsidian wanted to add a new Fighting Style. As long as the Fighting Style relied upon the Companion superclass’s methods, Obsidian would not need to create a new version of every Companion with that fighting style. 

It’s important to note that just because any Companion can do something doesn’t mean that they do it well. For example, Obsidian could decide that when the Morty companion receives a command to Heal(), he cries and heals himself 0 points. While this may not be the best design, it is technically sound. Morty is fulfilling the Heal command - it’s just that his implementation of Heal doesn’t actually involve healing. The Bridge pattern ensures that Companions carries out requests from the Fighting Style. It doesn’t ensure that any Companion fulfills that request in a particular way.

A UML diagram of how Outer Worlds could implement the Bridge pattern. Click on this image to see this diagram in more detail.

Since the Bridge pattern allows Companions to create their own definition of fulfilling the Fighting Style’s requests, Obsidian has significant room to make creative choices. If they wanted to be very experimental, they could create a comically rebellious Companion that does the opposite of whatever you tell them to do. This character would Heal when you ask them to be Aggressive and Charge when you ask them to be Passive. To create a character like this, Obsidian would need to define Heal() as attacking and Shoot() as healing. This Rebel companion would still fulfill the Fighting Styles requests - they would Heal() when asked to Heal(). But like Morty, their version of Heal() would not include Healing. This is admittedly a silly example, but I think it underlines that Companions define how they execute the Fighting Style’s commands.

The Bridge pattern has other drawbacks as well. There’s a chance that a Fighting Style and a Companion may combine to create strange behavior. For example, imagine each of our companions has an Energy stat that they need to draw from to perform actions. The Morty Companion has 10 Energy by default and spends 3 energy to Shoot. If the Aggressive Fighting Style requires its Companion (Morty) to Shoot 4 times (requiring 12 energy) Morty cannot fulfill the Aggressive Fighting Style unless we consider his inability to Shoot a fourth time a successful execution of the Shoot command. When Companions manipulate variables that are outside the Bridge pattern as Morty did, there can be room for error.

This pattern doesn’t make sense in all cases. If each Companion in The Outer Worlds had a distinct, unchanging personality in combat, another pattern might be more appropriate. But since it has one superclass that relies heavily on another, a Bridge might be useful.

The Bridge Pattern has many strengths:

  • I can add, modify, or delete any Fighting Style or Companion without breaking anything.

  • I don’t have to handcraft an object that represents every combination of a Companion and an Fighting Style.

  • I can pair or unpair any Fighting Style and Companion during runtime.

Implementation Details:

C# Implementation

Helpful Tutorial


Thanks for reading! If there are any other programming books that you recommend, please comment below!

Design, Games, Writing

New Gameplay Videos from CineMoiWorld: Quest and NPC Design

CineMoiWorld, a project that I was a Narrative and Systems Designer on, was recently published in the Samsung Store, so I can finally share some videos of the project’s gameplay that I designed and wrote! I have also included a link to the project’s opening animation, which I wrote and directed. The two gameplay videos also include some developer commentary from me. Check it out below!


Quest Playthrough with Commentary


NPC SYSTEM PLAYTHROUGH WITH COMMENTARY


OPENING ANIMATION THAT I WROTE AND DIRECTED:

Certificates, Games, Programming

I Completed a Course on SOLID Principles!

If you’re not familiar with the SOLID principles, they are a set of principles that software engineers use to futureproof their code. They don’t necessarily make writing your code the first time easier, but they do make all subsequent modifications easier and less bug-prone.

Robert Nystrom, in his book Game Programming Patterns, states that your codebase should be like a calm pond - it shouldn’t ripple when you touch it. The SOLID principles are in pursuit of this same goal: to minimize the bugs and rewriting that occurs when new features or modifications are made to an existing codebase.

Here are the five principles with a brief explanation of each:

Single Responsibility Principle: every software component should have only one purpose and/or one reason to change.

Why? Let’s say we to want to create a game in which a Farmer class Digs up Vegetable objects (capitalization used here to designate classes and methods). We also want to create a Scavenger class that can Dig up wild Vegetables.

The incorrect approach would be to forego writing a Shovel class and instead write our Farmer and Scavenger classes so that they have the ability to Dig inherently. Our Farmer and Scavenger classes are now responsible for everything that Farmers and Scavengers do respectively plus Digging, so we are in violation of the principle.

But what if we have to change how Digging works in our game? In that case, we now need to change the Dig function in both our Farmer and Scavenger classes. Because we’re changing two classes instead of one, there is more work for us to do and we’re more likely to leave bugs in our wake.

If we were following the SRP, we would instead have separate Farmer, Scavenger, Shovel, and Vegetable classes; our Farmer and Scavenger classes would call on the Shovel class to Dig Vegetables. With this approach, if we need to update our Digging, we only need to update our Shovel class.


Open-Closed Principle: You should be able to add features to your codebase without modifying existing code.

One basic way you can follow this principle is by using generic classes that you believe will encapsulate objects that will be added to your game later on. To continue our Farming game example above, let’s say you want your Farmer class to run an ExtractSeed function on Blueberry objects, but you expect that you will probably want the Farmer to run ExtractSeed on other fruits in the future.

Instead of setting the parameter of ExtractSeeds to Blueberry {ExtractSeeds(BlueBerry incomingBlueBerry)}, you can instead set the parameter to Fruit {ExtractSeeds(Fruit incomingFruit)}. This way, you can have the Farmer run ExtractSeeds on Watermelons, Strawberries, and Kiwis without having to update the ExtractSeeds method.


Liskov Substitution Principle:

You should be able to replace any class with any of its subtypes without breaking your codebase.

In plain English, this means all objects called Fruits should be Fruits, all things called Animals should be Animals, etc.

Why? Imagine our Farmer class has an ExtractSeeds method that takes in a Fruit class and returns Seeds. (All Fruits have seeds of some kind.) If Rhubarb is mistakenly labeled as a Fruit due to its sweet flavor, the game will break when the Farmer runs ExtractSeeds on the seedless Rhubarb.


Interface Segregation Principle:

Interfaces are like Scout Badges; they signify that someone has a specific skillset. For example, if a class implements a IFlier interface, you can assume that it can Fly.

The Interface Segregation Principle basically says that interfaces should be narrow enough that they only cover one set of tightly related functionality. So an IFlier interface should not also contain functions that relate to combat. The reason for segregating interfaces is straightforward: if we put Combat-related functions in our IFlier interface, we might end up with a Hummingbird class that has a Slash function, which is not appropriate.

Many languages allow classes to implement multiple interfaces, so you could have an Eagle class that implements both your ICombatant and IFlier interfaces.


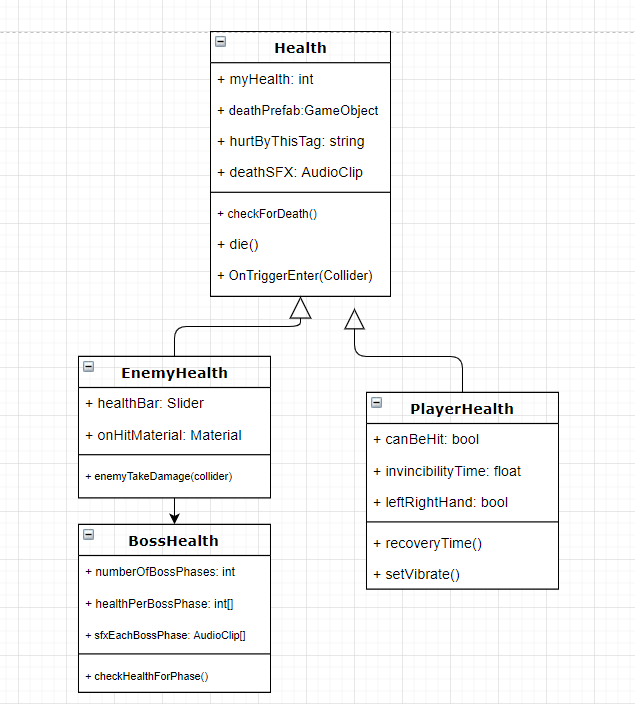
Dependency Inversion Principle:

The Dependency Inversion Principle is perhaps the most complex of the SOLID principles. It contains several subprinciples and concepts, which I will explain below:

The first concept to understand is high-level vs low-level functionality. High-level functionality is functionality that is “close” to an Input or Output device. In a game development context, this could be menus that are shown to the player or inputs taken in from the player’s controller. Low-level functionality is functionality that is “far’ from an I/O device. This would include pulling data from databases and running operations on local player data.

The second, more complex subprinciple of the DIP is that you want your high-level classes to depend on interfaces rather than specific instances of classes.

As mentioned in the Interface Segregation Principle section, an interface is like a Scout Badge: it signifies a particular set of functionality. If a class implements an interface, it is given that interface’s methods.

For example, if an NPC class implements an ITrader interface, then it will have the ability to perform Trade functionality in addition to all the other things that an NPC can do.

Let’s continue with the Scout Badge metaphor to explain the concept of Dependency Injection, which is the third concept wrapped up within DIP. Let’s say that a Cantina class needs a Camper class with a Culinary interface to work in the Cantina’s kitchen. Dependency Injection is the practice of that Cantina asking at Awake() or within its constructor for a Camper with an ICulinary interface as opposed to a specific Camper with an ICulinary interface.

It’s the difference between, “Get me Seth, who knows how to cook” VS “Get me somebody who knows how to cook.”

Why does this matter?

With this structure, the Cantina does not need to rewrite its code extensively for it to change the Camper with an ICulinary interface that it will be using. In other words, the Cantina’s kitchen keeps running even when Seth is out sick.

Here is that same example written out in code:

public class Cantina : MonoBehavior {

public CantinaSettings myCantinaSettings;

private ICulinaryTrained myCulinaryTrained;

void Awake() {

myCulinaryTrained = myCantinaSettings.camperWithCulinaryTraining;

}

}

public class JuniorCamper : ICulinaryTrained {

@Overriding the CookFood method from ICulinaryTrained.

public void CookFood () {

MakeSmores();

}

}

public class SeniorCamper : ICulinaryTrained {

     @Overriding the CookFood method from ICulinaryTrained.

public void CookFood () {

MakeBeans();

}

}

Given how we wrote the three classes above, the Cantina can freely switch between types of campers with Culinary training without rewriting almost any code. You’ll notice that SeniorCamper and JuniorCamper have different overrides of the CookFood method from ICulinaryTrained. What this means is the Cantina can choose between the two kinds of campers and their respective interpretations of food while ensuring it is getting some kind of food.


I love hearing new perspectives on these topics, so please leave some comments below!

Jukebox Beatdown, Games, Design

Jukebox Beatdown: Final Release and Gameplay Video

After several months of work, I am excited to announce I am releasing the final build and gameplay video for Jukebox Beatdown, my VR rhythm-combat game!

New Features in this build Include:

  1. A ranking system that gives you a grade based on your accuracy, speed, health, and ability to stay on-beat.

  2. A new fourth phase in the Funky Franny battle. During the saxophone solo, Franny will now unleash slash attacks upon the player.

  3. A new interactive tutorial that tests the player’s understanding of core mechanics.

  4. Visual overhaul of Funky Franny’s attacks

  5. A “Lose” Screen that shows how close you are to beating Funky Franny.

  6. A rework of the game’s sound effects.

  7. Reworked the third phase of the Funky Franny fight to make it easier.

To see all these new features in action, check out the new playthrough video below:

Thank you to everyone who supported the development of this game, especially our team and playtesters!

Credits:

Game By: Brett Moody

Music By: Benjamin Young

Vern-Omega Voice By: TinyMike

Jukebox Beatdown, Producing, Games, Design, Programming, XR

Blog Post #4: The Finish Line

This most recent sprint was one of the most challenging but fulfilling sprints yet!

The end of this sprint coincided with the final submission deadline for the Oculus Launchpad program, so it was time to finish the project’s remaining essential features while also building out promotional materials and responding to playtest notes. Needless to say, I didn’t sleep much. 😊

The Oculus Launchpad program only distributes grants to a handful of its more than 100 participants based on the merit of their vertical-slices, so my demo had to be looking and playing its best. I didn’t have the money to continue building Jukebox Beatdown beyond my vertical slice, so the project’s survival depended on the grant.

For my project to be eligible for Oculus’s consideration, it had to meet the following requirements:

  1. Provide a complete experience in five minutes or less.

  2. Meet the Oculus Store’s technical standards, especially in terms of performance.

  3. Be accompanied by at least a basic press kit.

In this post, I’ll discuss how I reached each of these goals, which are divided nicely into the categories of Design, Engineering, and Marketing:

  1. DESIGN: Building the game’s five-minute demo by scripting the attacks of Funky Franny, the game’s first boss.  By doing so, we hoped to achieve the game’s central promise of boss-fights set to music.

  2. ENGINEERING: Optimizing the game so that it met the Oculus Store’s technical requirements (and didn’t trigger VR-nausea).

  3. MARKETING: Building a professional and exciting presence for the game online through my press kit.

The final banner art for the project.

The final banner art for the project.

Design

This was far and away the most fun sprint of this game’s production because I finally had the technical foundation to fulfill the game’s central promise: boss battles set to music.

Like the movie Fantasia, we wanted all the bosses in Jukebox Beatdown to have their actions choreographed to music.

This was an intimidating goal. The song I commissioned for this project had multiple saxophone, horn, drum, synth, bass, guitar, string, and keyboard tracks each with either a unique melody or rhythm. It was a bit overwhelming to decide which sound would be paired with which attack.

To make this process easier, Ben Young, the game’s composer, designed our song so that it had four distinct, self-contained phases. We thought that these self-contained phases would make it easier for the player to notice when the music matched with the action of the game.

A screenshot of the Ableton project for the game’s song.

A screenshot of the Ableton project for the game’s song.

To cut through the noise (pardon the pun), I made a list with two columns for each of these four sections. One column had all the tracks in that section (saxophone, guitar 1, guitar 2, etc.) and the other column had a list of attacks I could create for the game. This list was an anthology of riffs on attacks I had seen in other games with great bosses, such as Dark Souls 3, Cuphead, Titan Souls, and Furi, plus some inventions of my own.

From there, it became a jigsaw puzzle of music, visuals, and gameplay. Using the music, which was basically set in stone, as a starting point, I tried to pair the attacks and music together. The design process was complex and went like this: what fits a guitar melody better, a flurry of lasers or a series of rapidly-exploding bombs? If I tie the lasers to the guitar, that means I can’t use them for the saxophone, so what should I tie into the saxophone? If the lasers are more difficult than the bombs, maybe they should be with the saxophone, which comes in predominantly at the end of the song – but now I am using the bombs for the horns, so what should go with the guitar now? Moving one element displaced another.

This process of experimentation continued until we had built out the first several phases of Franny’s fight:

However, now that we had added all this new content, our framerate had dropped into the teens. It was time to put our engineering hat on and optimize the project.

Engineering (Optimization)

From an engineering perspective, VR development can be one of the most challenging forms of game development. One of the main reasons that VR development is so challenging is that the slightest amount of lag can make someone sick. If you’ve ever played a new game on older hardware, you’ve probably noticed the game’s graphics lagging for a moment before updating to where they should be. This is never desirable but is especially unwanted in a VR context because the slightest amount of lag can cause the player to get nauseous.

The dangers of lag.

People get nauseous when the stimuli that their eyes are receiving does not match the stimuli that the vestibular system in their ear is receiving. (The vestibular system gathers and transmits data about our body’s position through several organs in our ear.) To minimize the difference between what these stimuli, Oculus requires all desktop-connected VR content to run at 90 frames per second.

Not my diagram. I would credit this but the original link is now a 404.

Not my diagram. I would credit this but the original link is now a 404.

Unfortunately, after my first design pass, my game was running at around 15 to 30 FPS at worst on my mid-range Razer laptop. To hit 90 FPS, I had to use many optimization tricks, including:

  1. Using object pools as I mentioned in my previous blog post.

  2. Eliminating almost every unnecessary UI canvas object from my scene in Unity as they were constantly being recalculated, putting unnecessary stress on my CPU.

  3. Eliminating almost every dynamic light in the scene and replacing it with lightmapping, which is essentially the practice of “painting in” a scene’s lights and shadows beforehand than simulating those at runtime.

However, the most impactful step for me was reducing my draw calls.

A draw call is the directions that a CPU (Central Processing Unit) gives to the GPU (Graphical Processing Unit) about what to render in a scene. Specifically, the draw call is the information that the GPU needs to render each object in the scene. While most computers’ GPUs do not struggle to execute these directions once received, preparing these directions puts significant strain on the CPU, which results in lag.

To use a filmmaking metaphor, you can imagine the CPU as a location scout and a GPU as a lightning-fast set-builder. In the context of the metaphor, the CPU is visiting the “real location” and sending instructions back to the GPU on what to build in the movie-set. The CPU/location scout looks at objects that make up the “real location” and communicates every visual detail about them to the GPU/set-builder, who recreates them.  However, to extend the metaphor, the CPU/location-scout is using a slow fax machine, so sending these details to the GPU/set-builder takes a long time and can slow down the entire process. Thus, the more succinct the directions can be, the faster the GPU will be able to build the set. We’ll use this metaphor as a way of explaining some of these optimization techniques.

Below is a timelapse that shows a scene in Jukebox Beatdown being rendered one drawcall at a time.

To reduce my draw calls, I used two techniques: mesh-baking and texture-atlasing.

Mesh-baking is when a developer takes several meshes (3d models) in their level/scene and turns them into one mesh. If we bake three meshes into one, our CPU will now need to process one draw call for those three meshes instead of three. In the context of Jukebox Beatdown, we generally baked together most meshes that shared the same shader, which is code that dictates how an object reacts to light. Our floor, for example, was made of about sixty different meshes; we baked these into one object.

To continue our movie metaphor, now that the meshes are baked together, our CPU/location-scout can describe, for example, a group of ten stereos as a group of ten stereos rather than communicate information about each stereo one-by-one. Put another way, it’s the difference between counting bowls of rice versus counting individual grains of rice. Preparing and sending the directions is the bottleneck in this context, so using succinct instructions is paramount.

Texture-atlasing is the process of aggregating all a game’s textures onto one image file. If a project is not texture-atlassed, every texture in the game is contained within a unique image file. The problem with this setup is that as the number of unique images go up, the number of draw calls go up as well. So, in order to minimize the number of images that need to be sent by the CPU, developers will pack as many textures as they can onto one image or texture atlas. The GPU will then look at this atlas for every texture that it needs.

In our location-scouting metaphor, texture-atlasing would mean that instead of taking pictures of every scene in our metaphorical “real-location” and sending them through the slow fax machine, our CPU is instead sending one page that contains all the pictures.

TextureAtlasForVirtualCity.jpg

A texture atlas for the buildings in a virtual city.

All these changes together helped us reach our technical performance goals. Now, it was time to make sure our project’s marketing was as engaging as the project itself.

Producing

The Oculus Launchpad program is highly competitive, with only three to five grants awarded to around fifty entries. I knew that some of the other entrants had teams that were five or more people strong (compared to my two) and had significantly larger budgets than I did, so I knew my project needed to look as polished and exciting as possible.

At the Oculus headquarters in San Francisco area for the presentation day.

At the Oculus headquarters in San Francisco area for the presentation day.

For my project to receive the grant, it had look professional. I knew that I had the skills to reach the required level of polish as a designer and a programmer, but maybe not as a voice-actor, graphic designer, or 3D modeler. Even if I did have the skills for those later responsibilities, I knew I didn’t have the time to do them all.

I had a $200 and a month to get the project ready for Oculus.

To ensure that I would get everything I needed by the grant deadline, I made a list of what features and assets would constitute the vertical slice of Jukebox Beatdown and then planned backwards from that date (February 28th). I then prioritized each of these items by how important they were and how much lead time they would need in order to be completed. My scrum training came in handy here.

From there, to decide which items I would outsource, I took a “time is money” approach. I estimated how long each item would take in hours if I did them myself and then multiplied that number by my hourly pay. I then compared how much it would cost to pay someone to do the same job on Fiverr. When a task was significantly cheaper to due via Fiverr, I outsourced it.

Ultimately, I ended up outsourcing a considerable amount of work, including the voice-acting, poster design, logo design, and character artwork. I spent $200 between several vendors to get all these items. This amount of work took about two weeks to be delivered.

In the gallery below, you can see the final artwork followed by the original sketch I sent to the Fiverr artists:

To do so, I started using Fiverr, a freelancing website, which was a great experience. If you decide to use Fiverr for your work, consider using my referral code, which will give you 20% off your first order: http://www.fiverr.com/s2/5b56fb53eb

Full disclosure: I will receive Fiverr credits if you sign up with the above link as part of their referral program. I am not affiliated with them in any other way. My opinions are my own.

Presentation

With my game built, optimized, and marketed, it was time to present to fly to Menlo Park, CA and present the game:

next Steps (Several Weeks Later)

Unfortunately, Jukebox Beatdown did not win any of the Launchpad grants. However, I am very happy with the project and will be polishing the vertical slice for release on itch.io so that others can play it.

Amongst other small tweaks, this next sprint will be about:

  1. Adding more attacks to Funky Franny’s moveset.

  2. Adding a system that ranks the player’s performance within the boss battle like this.

  3. Giving the game more “juice,” which means to make the game feel more visceral.

Thank you for following the development journey of Jukebox Beatdown! You can expect one or two more blog posts about the project followed by a release on itch.io!

Jukebox Beatdown, Awards and Festivals, Design, Games, XR

I Gave a Talk About my Game Jukebox Beatdown at the Oculus/Facebook Headquarters!

In February, I had the chance to talk about my rhythm-combat game Jukebox Beatdown at the Oculus / Facebook headquarters as part of the Oculus Launchpad program’s Demo Day!

During Demo Day, all of the Oculus Launchpad members are invited to Northern California to present their projects to the Oculus leadership and the other Launchpad members.

Check out a recording of the talk below!


Design, Games

I've Started a New Job as a Game Designer!

I’m excited to announce that I have started a new job as a Game Designer at Cinémoi, a television network focused on film, fashion, and international style.

I’m helping design CinémoiWorld, a new mobile multiplayer game set within the wider Cinémoi universe of film, fashion, art, and music.

As a Game Designer, I am:

  • Part of a two-person team designing the core game loop.

  • Designing mini-games within the core game loop.

I cannot share many more details at this point, but will update the blog with publicly-available information on the project as it is published by the company! We are working on exciting stuff!

Jukebox Beatdown, Design, Games, XR, Programming, Producing

Jukebox Beatdown Development Blog #3: Hitting Reset

This past month working on Jukebox Beatdown has been demanding but productive: I rebuilt the game’s mechanics, reconstructed my codebase, and recruited new team-members. In this blog post, I will update readers on new features within Jukebox Beatdown. Along the way, I will also talk about the challenges I faced and how I approached them as a designer and software engineer.

(The section entitled Engineering is structured more like a tutorial, so feel free to skip if you are not interested in computer science.)

Want more Jukebox Beatdown? Join our mailing list:

Overview

My design process is very player-centric, so playtesting (asking friends to give feedback on the game) is a crucial part of my process. My friends’ feedback provides direction for the next phase of development. If you have been following this blog, you may remember that my most recent playtest session gave me three primary notes:

  1. The game needs more “juice.” In other words, there needs to be more feedback for the player’s inputs. More simply, the gameplay is not satisfying.

  2. If the game is going to be marketed as a rhythm game, music needs to be a bigger part of the game’s mechanics.

  3. It needs to be clear that the player’s hands are the player, not their head. Alternatively, this mechanic needs to be reworked.

  4. Most importantly, the core gameplay loop (“boss fights synced to music”) sounds compelling, but the most recent execution of that idea is not engaging players.

This blog post will cover three main topics: Design, Engineering, and Producing.

An still from the previous iteration of Jukebox Beatdown. Dr. Smackz, the giant boxer pictured above, punched to the beat of Mama Said Knock You Out by LL Cool J.

An still from the previous iteration of Jukebox Beatdown. Dr. Smackz, the giant boxer pictured above, punched to the beat of Mama Said Knock You Out by LL Cool J.

Design

I am generally a bottom-up designer, which means that I try to find a fun, exciting, and unique mechanic then build other aspects of the game (story, art, engineering) around that mechanic.

While the above adjectives are subjective terms, there are a few concrete questions that can confirm the presence of each:

  1. Fun: If a player plays a prototype of my game, do they want to play it a second time?

  2. Exciting: When someone hears the elevator pitch for my game, do they ask a follow-up question?

  3. Unique: When hears someone the elevator pitch for the game, do they assume it is a clone of an existing game? (I.E., “So it’s basically Beat Saber?”)

As I mentioned in my previous blog post, Jukebox Beatdown was passing the “Exciting” test but failing the “Unique” and “Fun” tests. People were hooked by the pitch but bored by the gameplay. They also perceived the game as being a Beat Saber-clone, when it was actually a rhythm game crossed with a bullet-hell game.

Beat Saber is one of the most famous VR games and by extension, the most famous VR rhythm game. Due to its fame, I wanted to steer clear of any mechanic that resembled Beat Saber too closely.

Beat Saber is one of the most famous VR games and by extension, the most famous VR rhythm game. Due to its fame, I wanted to steer clear of any mechanic that resembled Beat Saber too closely.

Given this, I decided it was time to start over and try to create a new mechanic that engaged players and incorporated music. If I could not create a new mechanic that passed these requirements in two weeks, I would put the project on ice.

My previous game’s most popular minigame revolved around using tennis rackets to keep falling eggs from hitting the ground. It was a weird game, but a fun one!

My previous game’s most popular minigame revolved around using tennis rackets to keep falling eggs from hitting the ground. It was a weird game, but a fun one!

My last VR game had had success with a basic “bat” mechanic (you had to bounce eggs falling from the sky with tennis rackets), so my first inclination was to prototype a version of that mechanic that could work in the context of Jukebox Beatdown. I created a “Beat Bat” that the player could swing at enemies. If they hit the enemy on the beat, which was designated by a bullseye-like icon that shrunk as the beat approached, they would get a critical hit.

A very quick screen-grab of the Beat Bat prototype. It didn’t feel intuitive to me and it felt too similar to Beat Saber.

A very quick screen-grab of the Beat Bat prototype. It didn’t feel intuitive to me and it felt too similar to Beat Saber.

As a player, I found this mechanic difficult and awkward. It also felt too much like Beat Saber, so I went back to the drawing board once more.

My next idea was to have the player shoot on the song’s beat in order to apply a damage multiplier to each bullet. I was worried that this mechanic would feel shallow, but I also figured it would be accessible to less musically-inclined players, so I built a quick prototype. My first prototype rewarded the player with a more powerful bullet when they shot on the beat in 4/4 time regardless of whether a note was played at that time. I liked this mechanic, but it felt too basic and unsatisfying.

To learn how to make the rhythm mechanic more compelling, I decided to study existing rhythm games made for both VR and traditional platforms. I studied Audica, Beat Saber, and Rez Infinite, but by far the most useful game to play was Pistol Whip. Whip was useful partially because it had a similar shoot-on-the-beat mechanic, partially because its implementation of that idea was frustrating, and partially because it was built for a different kind of audience. These elements made me think of how Jukebox’s mechanic could be different and, I thought, more satisfying to its audience. (As a side note, all of the games mentioned above are excellent. My notes on the games below reflect my personal tastes rather than my opinion of the game’s quality. They are all extremely well-crafted.)

Below were my main takeaways and notes from playing those games:

Pistol Whip:

Pistol Whip is a on-rails VR shooter in which you get additional points when you shoot on the beat.

Pistol Whip is a on-rails VR shooter in which you get additional points when you shoot on the beat.

  • The shoot-on-the-beat mechanic always applied even if there was no instrument playing on the beat. This created awkward moments in which you had to shoot on the beat but there was no way for you to know when the beat was occurring besides a faint visual tremor in the level’s environment art and a haptic effect on your controller.

  • The shoot-on-the-beat mechanic served no strategic purpose; this made it less compelling. As far as I could tell, there was no incentive to shoot on the beat besides raising your score. I felt that this limited the appeal of the game to people who care about high scores. As someone who never felt strongly about leaderboards, this made the mechanic less interesting to me. (There are people who love this kind of mechanic, so points and leaderboards are a great idea; I just felt the mechanic was a missed opportunity.)

  • The feedback for shooting on the beat was too subtle: when you shot on the beat in Pistol Whip, the only feedback you got was a red dot above the enemy you shot. This felt like a missed opportunity to reward players.

  • Your hitbox was your head: in Pistol Whip, you are your head. In other words, to dodge the enemy’s bullets, you need to move your head around. I’m not a fan of this design because:

    • I personally dislike standing up for long periods of time to play a game.

    • I worry about banging my head against my furniture.

    • My hands afford me finer control than my head does.

    • This control pattern makes the game inaccessible to some players with disabilities.

Audica:

Audica is a music-shooter from Harmonix, the creator of Guitar Hero. It was one of my favorites.

Audica is a music-shooter from Harmonix, the creator of Guitar Hero. It was one of my favorites.

  • A rhythm-game can be made more interesting by requiring the player to hold down the trigger at times. This was a mechanic I had not seen in many other VR rhythm games and which I may incorporate into Jukebox Beatdown in the future.

  • Audica has fantastic particle feedback for every successful hit. Particle feedback is highly satisfying.

Rez Infinite:

Rez Infinite is a critically acclaimed music-action-adventure game in which your shots are timed to the music.

Rez Infinite is a critically acclaimed music-action-adventure game in which your shots are timed to the music.

  • Rez Infinite made the interesting choice to ensure that the player bullets always hit the enemies on the beat by having the player lock-on to enemies and then fire homing missles rather than shoot them directly. When the beat played, the missles would fire out of the player and hit the locked-on enemies so that it appears that the player has hit the enemy in perfect time with the beat. I want to recreate this effect with the homing missles Jukebox Beatdown’s bosses will use against the player.


With these notes in mind, I built a new prototype with changes that I felt made the gameplay more interesting:

  • Shooting-on-the-beat became a risk vs reward mechanic. If a player shot on the beat consistently, they would be awarded an increasing damage multiplier: their first shot on the beat would multiply their damage by two, their next shot would multiply their damage by three, and so on. However, if the player missed the beat or was hit by an enemy, their multiplier would reset to one. This gave players two options: they could either time their shots to the beat in pursuit of a high damage multiplier (but have to lower their firing rate to do so) or they could ignore the multiplier and simply blast away, making up for their lack of damage per bullet with a higher firing rate.

  • Shooting-on-the-beat was made more dramatic. As the player shot on the beat, their bullets would grow larger and change color. Additionally, a Guitar Hero-esque combo counter was tied to the player’s hands.

ComboMultiplier.gif

With the shoot-on-the-beat mechanic on firmer ground, it was time to incorporate more music into the boss’s attack patterns. In my previous prototype, I had programmed the prototype’s boss, a giant boxer, to punch the player on the beat. However, almost none of my playtesters perceived that the boss’s attacks were tied to the music and some even expressed that they wished that it had been! 

It was time to turn things up a notch. I felt that if players did not recognize events on the beat, they might recognize specific actions tied to specific notes. With some engineering secret sauce, I put together a pipeline that automatically tied notes to specific game-events. For example, a C# note could fire a rocket while a B note would shoot a laser.

The red bullets that the Beat Brothers are dodging are triggered by notes within the song’s melody.

The red bullets that the Beat Brothers are dodging are triggered by notes within the song’s melody.

However, as I will note in the Looking Forward section, this change was still too subtle for players to notice.

Engineering

This section is more technical in nature and resembles a tutorial. If you are not interested in computer science, feel free to skip this section.

After I implemented the above mechanics, I found the game had two big problems: poor performance and significant disorganization. 

Performance:

Due to the high number of projectiles on screen and some funkiness with my music-syncing plugin, Jukebox was crashing within ten seconds of start.

To fix this, I implemented a game programming pattern called an Object Pool. The purpose of an Object Pool is to enable a program to generate and manipulate large groups of in-game objects without adversely affecting performance. Large groups of objects can cause problems because the operations for Creating and Destroying these objects are computationally expensive, especially when executed many times per frame. To sidestep this issue, the Object Pool instead generates objects at program-start then places them within a “pool” of similar objects. When one of these objects is required, it is activated and moved to where it needs to be. Once it is no longer needed, it is deactivated until it is required once more. This saves performance significantly because it removes the need to perform many expensive Create and Destroy operations.

In the case of my game, this pattern was a lifesaver because the gameplay evolved to include up to 80 bullets on-screen at any given time. With this pattern in place, I was able to eliminate crashes.

As the bullets go offscreen, they are deactivated and returned to the pool. From Ray Wenderlich.com, one of the many resources I used to learn how to create an Object Pool. Click on the link above to learn more about Object Pools.

As the bullets go offscreen, they are deactivated and returned to the pool. From Ray Wenderlich.com, one of the many resources I used to learn how to create an Object Pool. Click on the link above to learn more about Object Pools.

Organization:

Once I felt more confident about the project’s direction, it was time to refactor my code.

During prototyping, my code had gotten messy and found myself losing time because I was writing multiple versions of the same few functions for similar classes. For this reason, I decided to create some basic Inheritance Trees.

If you are not familiar with Inheritance Trees, it is a manner of organizing code so that it incorporates basic is-a relationships. Is-a relationships are useful because they allow us to define objects using abstract terms rather than stating every attribute of every object from scratch. The textbook example is classifying animals:

Assume that you do not know what a Dog is, but you do know what an Animal is. If I tell you that a Dog is an Animal, you may, for example, know that an Animal is living and that it can reproduce, so a dog must also be able to do those things. Rhinos and Chickens, by virtue of being Animals, must also have these attributes.

Animals_InheritanceTree.png

Assume now that you know what a Dog is but you do not know the traits of particular Dog breeds. If you know a Dog has ears and four legs, you can assume that a Greyhound, Chihuahua, and Great Dane do as well. That is the value of an Inheritance Tree: it enables you to define objects/classes without having to repeat yourself.

To write the inheritance tree for my health functionality, I took all my health classes and wrote down all their properties and functions. I then identified which properties and functions I wanted in every object that had health. These “essential” functions and properties were then put into my most basic health class. After this class was written, I worked myself “down” the tree, creating increasingly more specific classes as necessary.

One advantage of an inheritance tree like this is that it helped me enforce certain design standards. For example, I wanted every object to play a sound effect and spawn an explosion effect when it “died” so that combat always felt dramatic. By defining this functionality in my base Health class, it was included in all the sub-classes (descendants of the base Health class like EnemyHealth, PlayerHealth, BossHealth) so I did not have to remember writing the same functionality for every sub-class. 

Producing

One of the more challenging aspects of this project has been finding appropriate and compelling music on a tight budget.

Fortunately, I’m excited to announce that Benjamin Young, a composer whose credits include Love, Death, & Robots and Star Wars: The Old Republic, will be composing and recording an original disco song for the game’s vertical slice! Check out more of Ben’s awesome music here!

For the last bit of exciting news, I’m happy to say that we have a new logo! In my next blog post, I will introduce our new poster and concept art as well!

LogoPNG.jpg

Looking Forward

After implementing the above changes, I hosted a playtest party in December to see how players would react.

The response from the twelve play-testers was generally positive and it was clear that the next move would be augmenting these changes rather than changing direction once more.

 The critical feedback grouped around three main points:

  • The shoot-on-the-beat mechanic could be made more complex. In its current iteration, the shoot-on-the-beat mechanic is tied to the snare drum section of Disco Inferno. Some playtesters felt that the rhythm section be made more complex.

  • The boss’s attacks need to be made more interesting. At present, the boss follows a simple attack pattern in which he moves around the stage then does a special attack in which he spins while shooting many green pellets. This needs to be made more interesting.

  • The player needs more interesting choices within the game-loop. The risk-vs-reward dynamic in the shoot-on-the-beat mechanic is interesting, but I can give the player more opportunities to make interesting choices. For example:

    • Create “beat zones” that reward the player additional points when the player hits the beat within them. Make this a risk vs reward mechanic by putting the zones in dangerous spots.

    • Build a mechanic around holding down the trigger.

    • Reward the player for alternating which Brother/hand shoots on the beat.

  • There needs to be clearer feedback for the player’s actions. Combos, hits, and boss attacks need more visual and audio feedback.

Thank you for following the development of Jukebox Beatdown! To get blog posts, beta-invitations, and launch coupons for the game delivered to your inbox, sign up for our mailing list below:

Real Al's Human Academy, XR, Design, Games

Design Retrospective: Real Al's Humanity Academy #3: Crafting Game Mechanics

In this series of blog posts, I will talk about my process as a producer, designer, and programmer of Real Al’s Humanity Academy. I’ll discuss why I made the decisions I did in each of these roles to give readers a better idea of how I approach these disciplines. The intended audience of these posts are potential employers, collaborators, and/or fans of the game who want a more behind-the-scenes look.

In this post, I will discuss how our team designed the project’s game mechanics.


In the previous posts, I discussed why our team set out to make a VR party game and why we thought a minigame collection was the best fit for our team.

With our gameplay concept selected, we brainstormed individual gameplay mechanics. As in Warioware or Dumb Ways to Die, each minigame would be based around a simple mechanic. When the game progressed, the minigames would become increasingly complex and difficult.

The Dumb Ways to Die minigame collection was another source of inspiration for our game.

The Dumb Ways to Die minigame collection was another source of inspiration for our game.

A core principle that we kept in mind throughout this process was to design every minigame for VR and only VR. At that time, there were many VR titles on the market that were essentially 2D experiences shoehorned into the medium. We wanted to make something that could only be experienced in VR and that utilized VR’s strengths, such as its physicality and 360 degree environments.

One of my favorite aspects of VR is its physicality. Like the Wii remotes before them, the HTC Vive’s motion controllers feel fantastic when you use them to perform physical tasks like swinging tennis rackets, boxing heavyweights, or climbing mountains. To brainstorm minigame ideas, I would grab a Vive controller and play with it like a toy until I found a motion that I found satisfying. Then, I would try to spin this action in a surprising way. For our “Bounce the Eggs” minigame, I first started with the motion of hitting a tennis ball. At that point, I prototyped surreal variants of this action, like the balls transforming into balloons on impact or the balls shooting out from the floor. Somehow, we arrived at eggs falling from the sky in a supermarket.

Our “Bounce the Eggs” minigame in action.

Our “Bounce the Eggs” minigame in action.

Another aspect of VR that I loved was the fact you could build a game all around the player. There’s something magical about turning around while in VR and finding a whole new side of the environment for you to explore. We applied this thinking to our game by designing every minigame so that you had to turn around and explore your environment to win.

Early in my time at NYU, I went to a VR masterclass that had Saschka Unseld, the director of Oculus Story Studio, in attendance. He said:

Film is about showing, not telling.

VR is about discovering, not showing.

I found this statement to be true in my time as a VR consumer and we tried to apply this paradigm to our design of the minigames. Imagine that each level is divided into a north, east, south, and west quadrant. Whenever it was possible, we tried to put a compelling and unique gameplay or art element in each quadrant so that the player would always feel rewarded when they turned around.

The “Grab the Numbers” minigame forced players to turn around because the numbers they needed were sometimes behind them.

The “Grab the Numbers” minigame forced players to turn around because the numbers they needed were sometimes behind them.

I loved this phase of production because our team had the chance to experiment. We made minigames where you popped balloons, smashed computers, played blackjack with floating cards, and dodged evil bees.

To externally validate these designs, we were constantly playtesting our ideas. In order to expedite playtesting, I would parameterize the settings of the various minigames and then have playtesters try variants of the same minigame one after the other until they felt just right. For the egg bouncing minigame, I would modify the eggs’ speed, size, color, and sound effects until every bounce felt satisfying and fair. This method of iteration was one of my favorite parts of the process.

Sometimes, the minigames would get stuck even after several rounds of tweaking. When this happened, we’d review our playtest notes for a diagnosis. Most of the time, the issue was that the minigame was too complicated to understand in five seconds. When this happened, we identified the best part of the minigame and simplified or eliminated the rest. In one case, we had a minigame in which you had to use a flashlight to find a lever in the dark and then pull that lever. Playtesters didn’t like the minigame, but they did like the flashlight, so we kept the flashlight and redesigned the game around finding ghosts in a dark room.

Players loved our flashlight mechanic, but not the rest of the minigame, so we kept the flashlights and ditched the rest. To make the flashlights even more rewarding, we added about forty unique images to the walls of the flashlight level so that pl…

Players loved our flashlight mechanic, but not the rest of the minigame, so we kept the flashlights and ditched the rest. To make the flashlights even more rewarding, we added about forty unique images to the walls of the flashlight level so that players would be encouraged to explore the room.

When designing minigames, we found that a few guidelines generally held true. We measured our minigames’ success by two simple metrics: A) Did they want to play again? B) Did they say they liked the game? In general, we listened to “A” a lot more than “B!”

  1. Simpler minigames performed better. Every minigame that required two phases ultimately became a one phase game.

  2. Minigames that heavily utilized motion controllers performed better.

  3. Minigames that gave dramatic reactions to the player’s actions performed better, regardless of whether the player won or loss. [For most players, a dramatic failure is more satisfying than a tepid victory.]

  4. Minigames that forced the player to utilize all 360 degrees of an environment performed better.

  5. Minigames that asked the player to simply touch an object were not as satisfying as minigames that required “bigger” actions like swinging, punching, or throwing.

  6. For most players, the game felt well balanced and fair when they won about 75% of the minigames in the first round and won about 50% in the later rounds.

  7. Players appreciated failure the most when they could clearly see how close they were to success. I think the egg game was popular in part to the fact that you could clearly see how many eggs were left to bounce at any given time. On other hand, I felt that the ghost game was sometimes unsatisfying because you could easily feel like you had made no progress if you didn’t spot any ghosts.

A progress bar from the amazing Cuphead. Players love to see how close they are to success.

A progress bar from the amazing Cuphead. Players love to see how close they are to success.

At this point, we kept the game’s art and theming to a minimum. We wanted to to communicate the game’s general tone, but we did not want to finalize art assets until we knew that our game mechanics were solid. In general, we thought it would be easier to create a story around a set of mechanics than vice versa. I also didn’t want our team’s artists to spend time building assets for a mechanic that would ultimately be cut.

We knew from playtests that many players enjoyed taking turns playing the game with their friends. While this was great, we needed to give players a reason to invite others to play the game with them, so we implemented a simple local high score system. Putting a leaderboard in a game can awaken players’ competitive spirits; we found that most players would do an additional playthrough if they were aware of the leaderboard and were in the presence of their friends.

The final big test of our game’s mechanics that semester was the NYU Game Center’s biannual show. This was an important show for us because the show often had professional game designers in attendance.

The NYU Game Center, where this game was first designed.

The NYU Game Center, where this game was first designed.

Thankfully, the game was well received; several people even said the game was terrific. Most importantly, the game seemed to achieve its stated mission: it thrived in the show’s party-like atmosphere. Many people would first play the game individually then challenge their friends to beat their high scores. For me, this was a profound moment. We had built the foundation of a solid VR party game.

However, there was still significant work to do; the minigames needed refinement and the game lacked a theme. In my next post, I will discuss how I wrote the game’s script and how our team approached the game’s art.

Enjoyed this blog post?

Subscribe below for more dev blogs and news delivered to your inbox.

* indicates required

XR, Games

Real Al's Humanity Academy Launches Today!

I'm excited to announce that Real Al's Humanity Academy, a VR game I produced, wrote, co-designed, and co-programmed, officially launched on Steam today!

Check out the game here:

https://store.steampowered.com/app/1025710/Real_Als_Humanity_Academy/

If you like the game, please be sure to leave a positive review! (The game is made for the HTC Vive VR headset.)

Keanan Pucci and Matthew Ricci co-created this project; we collaborated on the project's design and programming.
Other awesome collaborators on this project include Brodie Cornett (the voice of Real Al), Daniel Pauker, Amanda Berlind, Anjali Krishnan, Alex Danger Raphael, Emily Zhao, Anthony Michael, Hilary Taylor, Julia Hemsworth, and Natalia Bell.

Without this superstar team, this project would have been impossible!

Thank you also to all those who playtested the game and to our professor Robert Yang at the Game Center for nurturing the original version of this project in his class. Thank you also to all of those who gave advice to us as we set up an LLC to launch the project on #Steam (you have been thanked in the project's credits!)